User management
The user admin page lives at Administration → User admin in the user-menu dropdown. It is where you create staff accounts, set roles, grant access to queues, and control the per-user settings that gate API access and notification style. Admin-only.
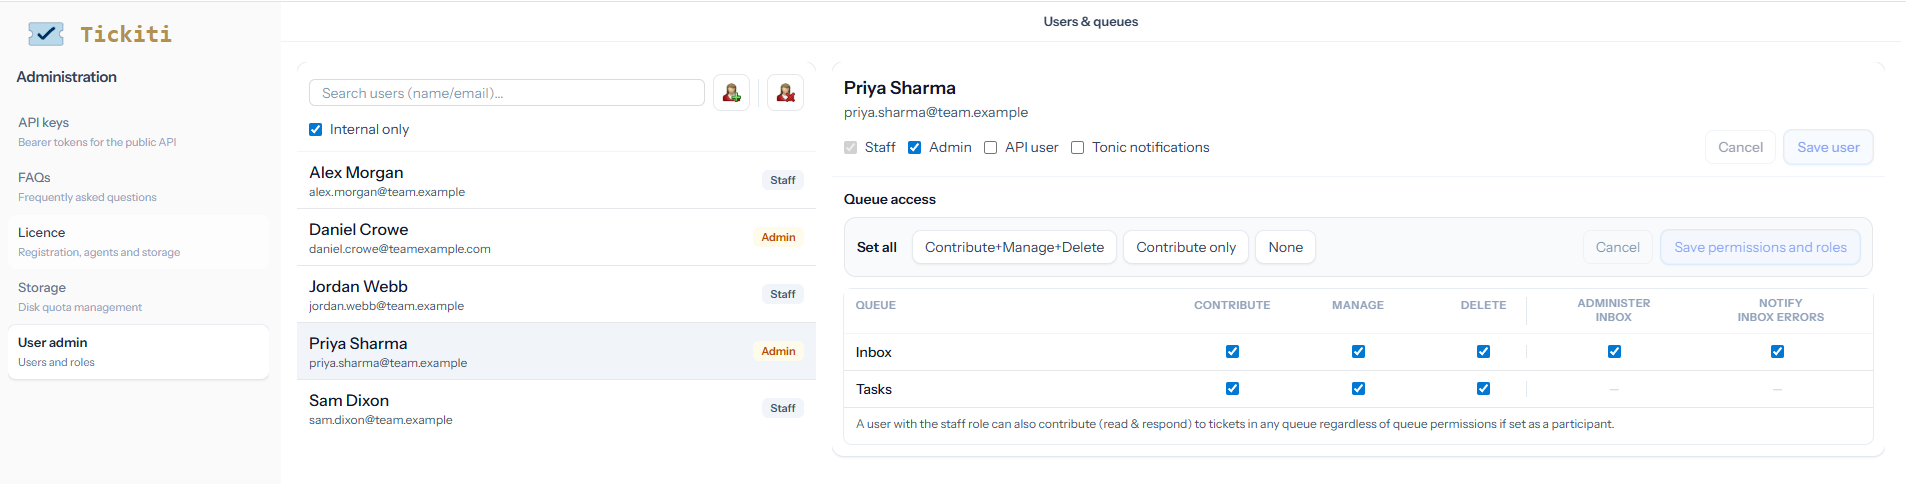
The user list
Each row shows a user’s name and email, with a role badge:
- Sysadmin — can configure system-wide settings and licensing. There is usually one of these.
- Admin — can configure queues, mailboxes, templates, attachment rules and other admin features.
- Staff — can sign in to the staff side of Tickiti and respond to tickets in queues they have access to.
- Unverified — the user has been created but has not yet confirmed their email or set a password. The badge sits alongside whichever role badge is highest.
The roles nest: ticking Sysadmin automatically ticks Admin and Staff; ticking Admin automatically ticks Staff. Tickiti enforces this in the form so a user can never end up admin-without-staff.
The Internal only checkbox below the search box (ticked by default) hides customers from the list so you only see your own staff. Untick it to find a specific customer record (e.g. for ticket assignment as a participant).
Adding a user
- Click the add-user button (user-with-plus icon) at the top of the user list.
- Fill in the user’s name and email.
- Tick the role boxes — Staff at minimum.
- Click Create.
- Tickiti emails the user a welcome link they click to verify their email and set their password. The link is signed and expires after seven days; if the user misses it, an admin can delete and re-create the account, which sends a fresh link.
Editing roles
Click into a user to edit. The role checkboxes cover everything Tickiti grants:
- Staff / Admin / Sysadmin — the nested permission roles described above. The Sysadmin checkbox only appears when the viewer is themself a sysadmin.
- API user — marks this account as an automation account rather than a person. The user is hidden from participant suggestions on tickets, excluded from agent-activity reports, and removed from staff dropdowns (e.g. intervention assignment). Use this for accounts that exist only to drive Tickiti via the API or to receive automated mail; it stops them cluttering up human-facing lists. It does not grant or restrict access to the API itself — that is governed separately under Authentication and tokens.
- Tonic notifications — sends notifications using the simplified Tonic template instead of the full email format. Useful for staff who want a leaner inbox; the content of the notification is the same, only the formatting differs.
- Must use two-factor — the user must use two-factor sign-in while System settings → Who must use two-factor sign-in is Selected users or All staff. It has no effect while that setting is Off. Shown to admins.
Two-factor sign-in
Next to Must use two-factor, a badge shows whether the selected user has set up two-factor sign-in: Two-factor set up or Two-factor not set up. A change to Must use two-factor is saved with Save user. A user who must use two-factor sign-in and has not set it up is taken to the setup page the next time they open a page in Tickiti.
Reset two-factor is for a user who has lost the phone with their authenticator app. There are no backup codes, so this is how they get back in. Only system administrators see the button, and only for a user who has two-factor sign-in set up. Click it and confirm: the user’s two-factor sign-in is cleared at once, and they sign in with their password alone. If they must use two-factor sign-in, Tickiti takes them straight to set it up again; otherwise they can set it up again from their profile. A reset leaves Must use two-factor as it is.
A system administrator who loses their own device needs another system administrator to reset it. On a site hosted by Tickiti with no other system administrator, get in touch with Tickiti support.
Queue access
The lower half of the edit pane is the per-queue access table. The columns are:
- Contribute — sees and can post on tickets in the queue. (See Assignment and queues for what each level grants.)
- Manage — can take ownership of, reassign and change attributes on tickets in the queue.
- Delete — can permanently remove tickets in the queue.
- Administer inbox — for inbox-capable queues, makes this user the fallback for unassigned escalations and other inbox-administrator duties on this queue.
- Notify inbox errors — for inbox-capable queues, this user receives notifications when the inbox has problems (mailbox failures, parser errors, etc.).
See Queue permissions for how queue access fits with the other access mechanisms.
Removing or disabling a user
To remove a user’s ability to sign in, untick all role boxes and save — their account survives (so audit history continues to work) but they can no longer log in. To delete the account entirely, click Delete user (trash icon at the top of the list).
Deleting a user that owns tickets does not delete the tickets — their email is preserved on the responses they wrote, so the audit trail remains intact. Personal watchlists and perspectives owned by the deleted user are removed.
See also Changing someone’s email address, WhatsApp notifications and Teams.